The third step in building YZY Kit Homes is to get all parts organized for installation.
We recommend you to sort the parts into separate piles. Lay the protective sheets on the ground around the perimeter of the base (you can use the sheets from the pallet) for the boards. All parts are numbered, so check that all parts are present by matching them off against your instruction manual.
Before unpacking the pallets, remove staples from boards
When you unpack the packs of timber that is covered in cardboard and plastic, you’ll see there is quiet a few staples that need to be removed as they will fail boards and hold boards off one another. So grab your self a pair of pincers and a chisel and just run your eye over through the thorough. Pull out all staples because they will rust in time too, specially in coastal applications, which will stain an outside of the board.
Organize all parts of the kit for effective and safe installation
Looking at the plans in the Instruction Manual, identify and place all parts on the sheets next to the side where they will need to go when installing the building. Place the boards for a convenient pick up to reduce walking time from boards to the building.
Expert’s tip
Assign a person (‘coordinator’) who will be looking at the drawings and coordinating men’s work organizing all parts around the perimeter.
Then you can start a routine:
- Pick up a part from the pallet, look at the number and say it loud.
- Coordinator will tell you which wall does it belong to, e.g. ‘A’, ‘B’, ‘C’ or ‘D’
- Look where this letter is marked on your flooring
- Place the part conveniently close to the wall it belongs to.
- Start your routine for the next part.
Lay the first layer of wall-boards
In Step 1, our expert in the video explained how to identify the first layer of all wall-boards. Now lay them all down on the subfloor in place where they supposed to be as per drawings.
Jack planning the first layer of internal walls (if applicable)
Skip this paragraph if you’re building a one room small cabin like Crete Panorama 10, Milos 14, Corsica Panorama 18 or Skyros 19. Also, skip this part if your foundation is done differently than illustrated below. Otherwise, read on attentively.
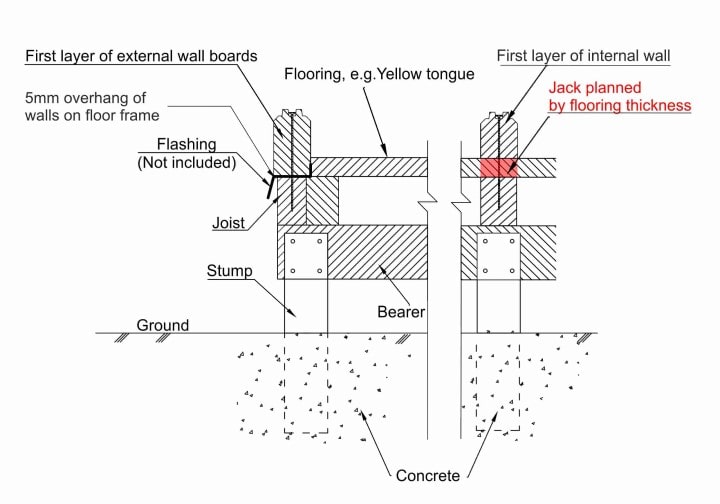
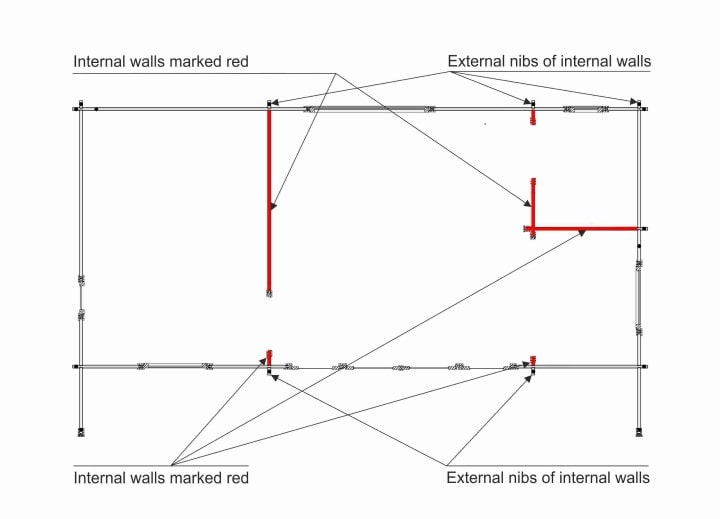
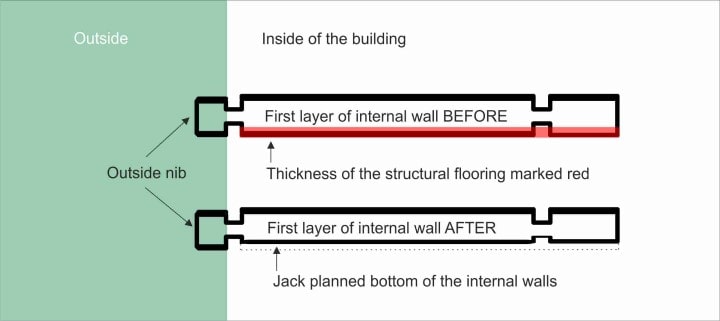
![]() Important: the first layer of all internal walls needs to be jack planned from the bottom by the thickness of the structural flooring (see Figure 1. below). In most cases our builders use 19mm thickness ‘Yellow Tongue’ flooring and if you have the same flooring, internal walls must be trimmed by 19mm from the bottom. If you have any other thickness flooring, jack plan internal wall-boards accordingly. Note, that all external nibs of the internal walls must be left NOT planned (see Figures 2. and 3. below).
Important: the first layer of all internal walls needs to be jack planned from the bottom by the thickness of the structural flooring (see Figure 1. below). In most cases our builders use 19mm thickness ‘Yellow Tongue’ flooring and if you have the same flooring, internal walls must be trimmed by 19mm from the bottom. If you have any other thickness flooring, jack plan internal wall-boards accordingly. Note, that all external nibs of the internal walls must be left NOT planned (see Figures 2. and 3. below).


If you’re not sure what is jack planning, watch this YouTube video form 57s:
The next step is sealing the bottom boards to stop any moisture penetration from the top of flashing. All other building steps can be found on Builders Guide page.
